
Three Free Tools to Optimize Your Migration of VMs into Azure
March Month in Review

Presented by Jeff Garrett, Opkalla VP of Solutions Architecture
Getting back on track again after a busy April with Spring Break and family travel, the next two Month-In-Reviews are going to be released within a week of each other. They are also going to be a little different format. This week I am focusing on a single conversation that was a big piece of our March and April advisements - Cloud Optimization. Specifically, Azure optimization. Next week’s Month-In-Review will focus on the Unified Kill Chain. This is a recently developed Kill Chain that looks to close the gap between the high-level phases of the Lockheed Martin Kill Chain and the very detailed approach of MITRE ATT&CK Framework. Hopefully you will find both pieces useful and educational. Now, on with the optimization.
Unlike the early days of Public Cloud, there is no secret now to how expensive it can be if not done correctly. Usually, the first thing organizations will acknowledge as they start to plan for a cloud transition is “we know it will be more expensive but…” and then lay out all the business cases of why cost is lower on the risk tolerance scale compared to other critical business initiatives that are driving them to Public Cloud.
Most organizations know the best way to reduce their overall spend in Public Cloud is to adopt more cloud native services. This could be anything from utilizing Containerized Applications to using Function-as-a-Service offerings or just relying on scalable Database services from the Public Cloud provider. These are all a means to better utilize some of the top benefits of cloud like …
Elasticity
Utility-based pricing
And geo diversity
… while getting away from one of the heaviest charged areas:
24x7x365 compute spend
However, even though cloud native services are the holy grail, most organizations will start with a lift-and-shift approach into traditional VM services and will have many applications that will run that way for years to come.
Until the holy grail can be attained by your organization, here are three simple things you can do to make sure you are not overspending on those lift-and-shift cloud migrations to Azure. Best of all, they involve free resources you can use at your disposal.
1) Use Azure Migrate to Collect Data and Insights About Your Current VMs
Azure Migrate is a free-to-use tool from Microsoft that you can download and deploy in your virtual environment. Installing it on Virtual Machines does not require any agents. Once you deploy the virtual appliance, you can connect it to the Azure Migrate service in your Azure subscription to start collecting data and getting valuable insights about your current VMs.
All the data collection and processing are completely free. This is mostly because this is an onboarding tool from Microsoft. They're not going to charge you when attempting to convince you to use their cloud.
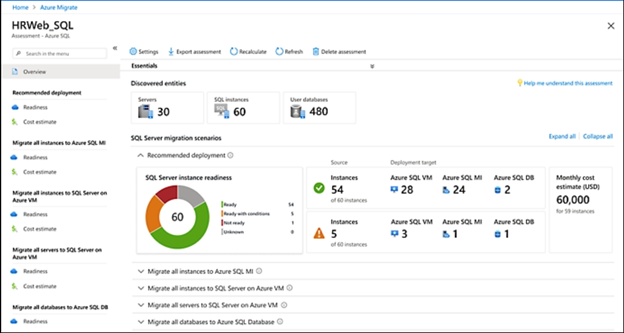
Azure Migrate doesn’t just help you move VMs. It will also give you insight into:
Which VMs are ready to move
Which VMs are not ready
And why
And most important of all – Azure Migrate helps you right-size your workloads.
More than likely your on-prem VMs are over provisioned on CPU, RAM, and Storage. It’s easy to do that when you have a cluster of beefy servers and a large, shared storage array as the foundation of your on-prem hypervisor of choice.
If you go the path many organizations have in the past and simply move these VMs as-is, you will most likely be overpaying for resources your VM does not even need. Getting in the right Azure instance size from the beginning helps keep monthly costs down, especially in the first few months before beginning to use offerings like reservations.
You can find more info on Azure Migrate here -> https://azure.microsoft.com/en-us/products/azure-migrate
2) Use Azure Advisor to See Cost Savings Measures You Can Take in Your Environment
Once you have migrated workloads into Azure, you will want to regularly check Azure Advisor. From the Azure Portal, you can find it simply by typing Advisor in the top search bar and then clicking on Advisor under services.
Here you will see cost savings measures you can take in your environment. This can include:
Resizing VM instances
Shutting down VM instances
Purchasing savings plans or
(The more common) purchase of Reserved Instances

Reserved instances can offer substantial savings on VMs compared to traditional pay-as-you-go instances. For example, an E2s v3 (2 vCPUs, 16GB RAM) instance in Region East US will cost around $159/month. With a 1-year reserved instance it would be around $124/month, and with a 3-year reserved instance it would be around $104/month.
However, proceed with caution as there are some caveats and circumstances you should consider:
Reserved Instances are purchased by instance size but are flexible in what Microsoft calls Instance Flexibility Groups. What you are essentially purchasing is a pool of resources to use within Instance Flexibility Group series. Using the example from above, a Standard_E2s_v3 instance is in the ESv3 Series flexibility group. This means if I wanted to run two E2s v3 instances I could purchase two Standard_E2s_v3 reserved instances OR I could purchase one Standard_E4s_v3 reservation (4 vCPUs, 32GB RAM) and run two E2s v3 instances and still be covered. Carefully check pricing for reservation types in each series as they can change by region.
While you can pay month-to-month, it is a commitment for compute and memory resources for the term you choose - 1 year or 3 years. Unlike normal pay-as-you-go, shutting down or deleting a VM does not stop monthly payments on the reservations.
You purchased reservations by region, and you can only apply them to VM resources in that region. Make sure you do not purchase reservations in East US 2 for VMs that are running in East US.
While purchasing reserved instances can help you save on compute and memory costs, planning will be key. I recommend that for any new VMs, stay with pay-as-you-go for a few months to make sure Azure does not recommend resizing the instance.
Once you have the VM size dialed in, your reservation purchase will be more accurate to your usage. Also, understand how long you may need resources, so you do not buy three years of reservations when you only need one year.
3) Use Azure Automation Power Off Unused VMs
One of the major benefits of Public Cloud computing like Azure is the utility-based pricing. You are only paying for what you use. Take some time to survey your environment. There may be several VMs that you can power off from time-to-time.
Test/Dev machines are a perfect candidate for this as you may not need them during off-hours. You can also schedule the shutdown of VMs so that any server not needed outside of business hours will automatically be powered off based on a schedule of your choosing. You can then start these servers back as needed or schedule a start activity.
When powering off VMs, be aware that using the shutdown command within the OS will not deallocate resources. You must make sure to stop VMs through the Azure interface or the scheduling process to get the Stopped (deallocated) status. If any of your VMs just say Stopped, you are still being charged for compute and memory resources.


Of note, no matter the state of the server, you will always be charged for storage. For more information on scheduling Start/Stop procedures in Azure, go here -> https://learn.microsoft.com/en-us/azure/automation/automation-solution-vm-management-config
This concludes our brief look at using three free tools to optimize your migration of VMs into Azure. Shameless plug time – if you want assistance looking into some of these tools for your own Azure environment, please reach out. Opkalla helps you navigate through these areas. We also save you money on your standard pay-as-you-go instances simply by becoming the billing partner for your Azure subscription.
Email support@opkalla.com and we’ll start by looking at next steps together.